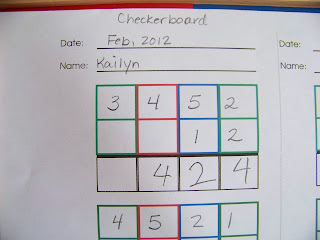
So here are the instructions for those of you wanting to give this "work" a try!
 First, we set up a problem to be solved and write it on paper such as this. I use the color-coding paper for her since she's still new at this. But it is not necessary. The colors correspond with the Montessori standard which is: Green=units, Blue=tens, Red=hundreds and in this case, the next level of green is the thousands.
 Next, she begins setting up the board. First with the multiplier and the multiplicand which is represented by the colored tiles on the right and the bottom of the checkerboard. The multiplier is always on the right hand side of the board.
She then sets up the beads. Since she is still working on learning her multiplication facts (has not memorized them yet) she uses the beads to help her. Starting with the units, she takes two of the "2" beads (green beads). Then she takes "5" two times (represented by the light blue beads), then she takes "4" two times, represented by the yellow bead bars) and so on.
 Once she has completed the first row, she then goes on to the next. It's hard to see the multiplier in this picture, but it is a "1" so each number is taken one time as is represented by the beads in each square. Notice that the squares in the second row begin with a blue square. This is the 'tens' square and helps the child visually see why we put a zero in that spot when doing multiplication on paper.
She now takes each set of beads in the top column and slides them at the diagonal, down to the bottom row. It is important that the beads in a blue square slide to a blue square, and red to a red square, and so on. These represent each staying with its own kind. 10s with 10s, 100s with 100s and so on.
 Once all the beads are in the bottom row, she now can add them up and exchange them. For example, in the green (units) square, the two "2" bead bars will be exchanged for a "4" bar. Any time she gets above 9, the bead bars will have to be shifted appropriately in the squares. For example, in the blue square there are a total of 12 beads. She would then take a "1" bead and a "2" bead bar. The 1 would move over to the red square (hundreds) and the 2 would remain in the blue square. Just like we would write it on paper - keeping 10s and 100s in their places.
This not only makes practicing math fun, but it enables her to practice math facts and learn placement of these numbers. When she memorizes all of her multiplication facts, then doing these problems will be a piece of cake. Or at least, they won't look overwhelming or confusing. Now, if only everything was this easy during home school!


I just found your blog while doing a google search for the directions for the checkerboard multiplication work - thank you for explaining it so well! :) I will definitely add you to my list of blogs to follow!
ReplyDeleteplease also explain finding factors through algebraic pegboard
ReplyDelete